文件的上传和下载
文件的上传和下载
本地存储
2
3
4
5
6
姓名: <input type="text" name="username"><br><br>
年龄: <input type="text" name="age"><br><br>
头像: <input type="file" name="image"><br><br>
<input type="submit" value="提交">
</form>前端提交过来的页面必须满足三个条件
- 表单
enctype属性为multipart/form-data,浏览器会以二进制流的方式对表单数据进行处理,由服务端对文件上传的请求进行解析和处理- 表单的提交方式必须为
post- 有一个表单项的
type为file
代码
2
3
4
5
6
7
8
9
10
11
12
13
14
15
16
17
18
19
20
21
22
23
24
25
26
27
28
29
30
31
32
33
34
35
36
37
38
39
40
41
42
43
44
45
46
47
48
49
50
51
52
53
54
55
56
57
58
59
60
61
62
63
64
try {
// 获取上传的文件
Part filePart = req.getPart("image");
if (filePart == null || filePart.getSize() == 0) {
resp.getWriter().write("No file uploaded");
return;
}
// 获取文件名(使用兼容的方式)
String fileName = getFileName(filePart);
// 防止文件名被覆盖
fileName = UUID.randomUUID().toString() + "_" + fileName.substring(fileName.lastIndexOf("."));
// 获取文件输入流
InputStream fileContent = filePart.getInputStream();
// 指定保存文件的路径
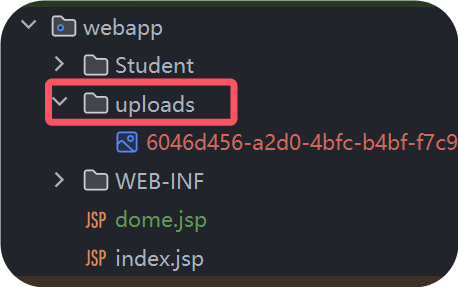
String uploadPath = getServletContext().getRealPath("/uploads");
File uploadDir = new File(uploadPath);
if (!uploadDir.exists()) {
uploadDir.mkdirs(); // 如果目录不存在,则创建目录
}
// 指定文件的完整路径
String filePath = uploadPath + File.separator + fileName;
// 将文件保存到本地
saveFile(fileContent, filePath);
// 响应上传结果
resp.setContentType("text/html;charset=UTF-8");
resp.getWriter().write("文件上传成功: " + filePath);
} catch (Exception e) {
resp.setContentType("text/html;charset=UTF-8");
resp.getWriter().write("文件上传失败: " + e.getMessage());
e.printStackTrace();
}
}
// 获取文件名的辅助方法
private String getFileName(Part part) {
String contentDisp = part.getHeader("content-disposition");
String[] tokens = contentDisp.split(";");
for (String token : tokens) {
if (token.trim().startsWith("filename")) {
//
return token.substring(token.indexOf("=") + 2, token.length()-1);
}
}
return "unknown_file";
}
// 保存文件的方法
private void saveFile(InputStream inputStream, String filePath) throws IOException {
OutputStream outpuStream = new FileOutputStream(filePath);
byte[] buffer = new byte[4096];
int bytesRead;
while ((bytesRead = inputStream.read(buffer)) != -1) {
outpuStream.write(buffer, 0, bytesRead);
}
outpuStream.close();
inputStream.close();
}要加
@MultipartConfig这个注解,它告诉 Servlet 容器这个 Servlet 需要处理 multipart/form-data 类型的请求
2
3
4
5
6
自定义方法
获取文件名的
getFileName方法,再servlet3.1.0版本中可以用filePart.getSubmittedFileName()获取文件名,但由于用的是maven插件运行的tomcat7,不支持该函数,所以采用兼容的方法。这个方法的作用是从上传的文件部分(Part对象)中提取文件名。在处理HTTP多部分请求时,文件名并不直接作为参数传递,而是包含在HTTP请求的头部信息中。这个方法通过解析content-disposition头部来获取文件名。在pom文件中自己导入servlet3.1的包可以用 request.getParameter获取文件传输的表单值,3.1以下不行
文件名通常是
filename="filename.jpg"的形式,取出文件名时我们不需要“,所以token.substring(token.indexOf("=") + 2, token.length()-1)跳过”。从HTTP请求中获取上传文件的流
inputStream,再通过输出流new FileOutputStream(filePath)将文件写入指定路径,创建缓冲区暂存读取的数据,最后将缓冲区中的数据写入文件
getServletContext().getRealPath("/uploads");这行代码的作用是获取Web应用中/uploads虚拟路径对应的实际文件系统路径,getServletContext()方法:这是HttpServlet类的一个方法,它返回一个ServletContext对象的引用,也就是返回web运行时的路径,后面就是指定的路径,如果没有该文件夹就创建
需要的maven依赖
2
3
4
5
6
7
8
9
10
<groupId>commons-io</groupId>
<artifactId>commons-io</artifactId>
<version>2.4</version>
</dependency>
<dependency>
<groupId>commons-fileupload</groupId>
<artifactId>commons-fileupload</artifactId>
<version>1.3</version>
</dependency>
远程上传
这里用的是阿里OSS存储服务
注册阿里云账号,开通对象存储OSS服务
创建
bucketName仓库创建AccessKey得到AccessKey ID 和 AccessKey Secret
设置为系统的环境变量,注意会话有效期,设置永久有效期用管理员权限打开终端
2
setx ALIYUN_ACCESS_KEY_SECRET your_access_key_secret
- 根据阿里云的SDK创建工具类
2
3
4
5
6
7
8
9
10
11
12
13
14
15
16
17
18
19
20
21
22
23
24
25
26
27
28
29
30
31
32
33
34
35
36
37
// Endpoint以华东1(杭州)为例,自己创建的地区,其它Region请按实际情况填写。
private final String endpoint = "oss-cn-hangzhou.aliyuncs.com";
// 填写Bucket名称
private final String bucketName = "web-cangqio";
// bucket所在地域
private final String region = "cn-hangzhou";
public String upload(InputStream inputStream, String fileName) throws ClientException {
//获取系统设置的环境变量
EnvironmentVariableCredentialsProvider credentialsProvider = CredentialsProviderFactory.newEnvironmentVariableCredentialsProvider();
// 创建OSSClient实例。
ClientBuilderConfiguration clientBuilderConfiguration = new ClientBuilderConfiguration();
clientBuilderConfiguration.setSignatureVersion(SignVersion.V4);
OSS ossClient = OSSClientBuilder.create()
.endpoint(endpoint)
.credentialsProvider(credentialsProvider)
.clientConfiguration(clientBuilderConfiguration)
.region(region)
.build();
try {
// 创建PutObjectRequest对象
PutObjectRequest putObjectRequest = new PutObjectRequest(bucketName, fileName, inputStream);
// 上传文件
ossClient.putObject(putObjectRequest);
// 返回访问URL
return "https://" + bucketName + "." + endpoint + "/" + fileName;
} finally {
// 关闭OSSClient
if (ossClient != null) {
ossClient.shutdown();
}
}
}使用配置文件定义环境变量,多环境配置
2
3
4
5
endpoint: oss-cn-hangzhou.aliyuncs.com
access-key-id: ***********************
access-key-secret: *******************
bucket-name: web-cangqio在你的dev环境或其他环境yml配置中配置
2
3
4
5
6
alioss:
endpoint: ${sky.alioss.endpoint}
access-key-id: ${sky.alioss.access-key-id}
access-key-secret: ${sky.alioss.access-key-secret}
bucket-name: ${sky.alioss.bucket-name}
application.yml文件中引入 实现代码
2
3
4
5
6
7
8
9
10
11
12
13
14
15
16
17
18
19
20
21
22
23
24
25
26
27
28
29
30
31
32
33
34
35
36
37
38
39
40
41
42
43
44
45
46
47
48
49
50
51
52
53
54
55
56
57
58
59
60
61
62
63
64
65
66
67
>import com.aliyun.oss.OSS;
>import com.aliyun.oss.OSSClientBuilder;
>import com.aliyun.oss.OSSException;
>import lombok.AllArgsConstructor;
>import lombok.Data;
>import lombok.extern.slf4j.Slf4j;
>import java.io.ByteArrayInputStream;
>
>
>
>public class AliOssUtil {
private String endpoint;
private String accessKeyId;
private String accessKeySecret;
private String bucketName;
/**
* 文件上传
*
* @param bytes
* @param objectName
* @return
*/
public String upload(byte[] bytes, String objectName) {
// 创建OSSClient实例。
OSS ossClient = new OSSClientBuilder().build(endpoint, accessKeyId, accessKeySecret);
try {
// 创建PutObject请求。
ossClient.putObject(bucketName, objectName, new ByteArrayInputStream(bytes));
} catch (OSSException oe) {
System.out.println("Caught an OSSException, which means your request made it to OSS, "
+ "but was rejected with an error response for some reason.");
System.out.println("Error Message:" + oe.getErrorMessage());
System.out.println("Error Code:" + oe.getErrorCode());
System.out.println("Request ID:" + oe.getRequestId());
System.out.println("Host ID:" + oe.getHostId());
} catch (ClientException ce) {
System.out.println("Caught an ClientException, which means the client encountered "
+ "a serious internal problem while trying to communicate with OSS, "
+ "such as not being able to access the network.");
System.out.println("Error Message:" + ce.getMessage());
} finally {
if (ossClient != null) {
ossClient.shutdown();
}
}
//文件访问路径规则 https://BucketName.Endpoint/ObjectName
StringBuilder stringBuilder = new StringBuilder("https://");
stringBuilder
.append(bucketName)
.append(".")
.append(endpoint)
.append("/")
.append(objectName);
log.info("文件上传到:{}", stringBuilder.toString());
return stringBuilder.toString();
}
>}通过SpringBoot管理需要创建配置类创建
AliOssUtil对象
2
3
4
5
6
7
8
9
10
11
12
13
14
15
16
17
18
19
* 配置类,用于创建工具类AliOssUtil对象
*/
public class OssConfiguration {
//使用@ConditionalOnMissingBean注解的方法返回的Bean类型在Spring容器中已经存在时,
// 这个方法不会被调用,即不会创建新的Bean
public AliOssUtil aliOssUtil(AliOssProperties aliOssProperties){
log.info("创建阿里云文件上传工具类对象:{}",aliOssProperties);
return new AliOssUtil(aliOssProperties.getEndpoint(),
aliOssProperties.getAccessKeyId(),
aliOssProperties.getAccessKeySecret(),
aliOssProperties.getBucketName());
}
}传入再HTTP请求中读取的文件流和文件内容就可以将文件传输到OSS存储服务创建的仓库中,也就是
web-cangqio,并且返回生成的URL地址,可以存储到数据库中持久化保存。不建议将你的id和密钥写入配置文件中,直接设置环境变量访问更加安全
使用MultipartFile 对象
- 依赖
2
3
4
5
<groupId>org.springframework</groupId>
<artifactId>spring-web</artifactId>
<version>5.3.9</version> <!-- 请根据项目需要选择合适的版本 -->
</dependency>
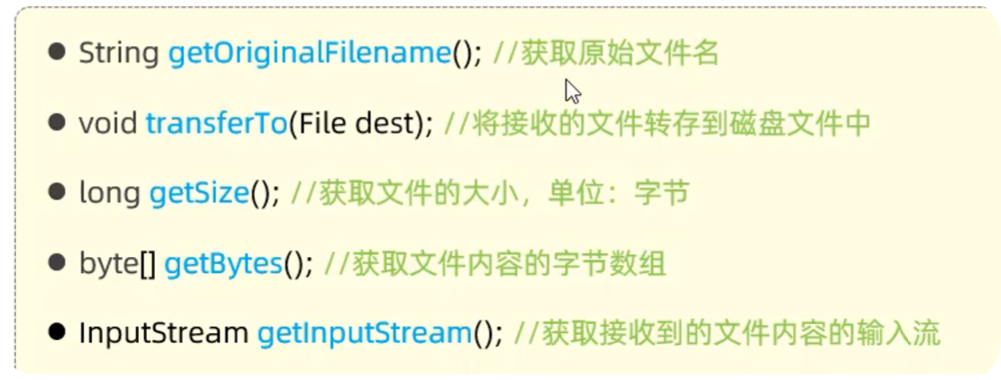
- 常用方法

- 使用
2
3
4
5
6
7
8
9
10
11
12
13
14
15
16
17
18
19
20
21
22
23
24
25
26
27
public Result<String> upload(MultipartFile file){
log.info("文件上传:{}",file);
try {
//原始文件名
final String originalFilename = file.getOriginalFilename();
//文件后缀
final String substring = originalFilename.substring(originalFilename.lastIndexOf("."));
//构造新文件名
final String objectName = UUID.randomUUID().toString() + substring;
//存储再本地
//file.transferTo((new File("E:/file/"+objectName)));
//文件的请求路径
final String filePath = aliOssUtil.upload(file.getBytes(), objectName);
return Result.success(filePath);
} catch (IOException e) {
log.info("文件上传失败:{}",e);
}
return Result.error(MessageConstant.UPLOAD_FAILED);
}
- 多文件上传
2
3
4
5
6
7
8
9
10
11
12
13
14
15
16
17
public String onfiles2(MultipartFile img[]) throws IOException {
for(int i=0;i<img.length;i++)
{
if(!img[i].isEmpty())//文件不空
{
//更改上传路径就可以远端上传
File imgfile =new File("F:/fileupload/"+img[i].getOriginalFilename());
imgfile.createNewFile();
img[i].transferTo(imgfile);
logger.info(img[i].getOriginalFilename());
}
}
return "sucucess";
}
文件的下载
原理就是通过服务端向客户端返回二进制流和信息,Springmvc通过ResponseEntity完成
2
3
4
5
6
7
8
9
10
11
12
13
14
15
16
17
18
19
20
21
22
public ResponseEntity<byte[]>download( String filename) throws IOException {
//下载文件的路径(这里绝对路径)
String filepath= "F:/download/"+filename;
File file =new File(filepath);
//创建字节输入流,这里不实用Buffer类
InputStream in = new FileInputStream(file);
//available:获取输入流所读取的文件的最大字节数
byte[] body = new byte[in.available()];
//把字节读取到数组中
in.read(body);
//设置请求头
MultiValueMap<String, String> headers = new HttpHeaders();
headers.add("Content-Disposition", "attchement;filename=" + URLEncoder.encode(file.getName(), "UTF-8"));
//设置响应状态
HttpStatus statusCode = HttpStatus.OK;
in.close();
ResponseEntity<byte[]> entity = new ResponseEntity<byte[]>(body, headers, statusCode);
return entity;//返回
}通过点击前端的页面就能实现下载的功能
其他
- 再yml中配置上传的参数
2
3
4
5
6
7
8
9
10
11
12
13
spring.servlet.multipart.enabled=true
# 上传文件的临时目录 (一般情况下不用特意修改)
#spring.servlet.multipart.location=
# 上传文件最大为 1M (默认值 1M 根据自身业务自行控制即可)
spring.servlet.multipart.max-file-size=104857600
# 上传请求最大为 10M(默认值10M 根据自身业务自行控制即可)
spring.servlet.multipart.max-request-size=104857600
# 文件大小阈值,当大于这个阈值时将写入到磁盘,否则存在内存中,(默认值0 一般情况下不用特意修改)
spring.servlet.multipart.file-size-threshold=0
# 判断是否要延迟解析文件(相当于懒加载,一般情况下不用特意修改)
spring.servlet.multipart.resolve-lazily=false


